이번에 수강하고있는 데이터베이스 수업에서
nl2query 실습과제가 주어졌다
nl2query계에서 가장 유명한 벤치마크 중 하나인
BirdSQL을 이용한 nl2query 실습과제였고
전반적인 nl2query 과정이나
수정 및 추가가 필요한 점들을 논리적으로 적어가는 과제였다
그래서 과제를 수행하는 과정들을
티스토리에 간단하게 기록해보려한다
BirdSQL
BIRD-bench
BIRD Mini-Dev A Lite version of developtment dataset, which is designed to facilitate efficient and cost-effective development cycles, especially for testing and refining SQL query generation models. For more details, please visit the GitHub repository. Fo
bird-bench.github.io
BirdSQL은 굉장히 유명한
nl2query benchmark이다
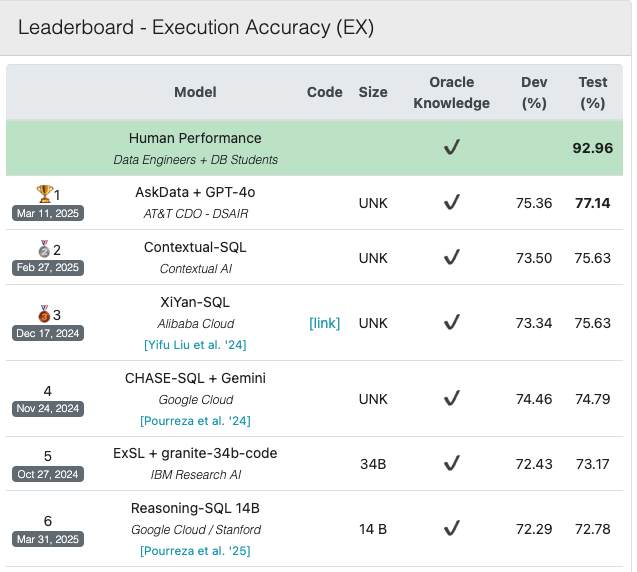
현재(2025.04.09) 기준
SOTA의 Dev와 Test의 정확도는 위와 같다
아무튼 수업에서 전반적인 nl2query 프로세스를 설명해주셨는데
그 내용을 간단히 정리해보려한다
nl2query
우선 nl2query란
사용자가 뱉는 자연어 질의를
DB의 쿼리 언어인 SQL로 변환하는 작업을 말한다
LLM이 발전하면서 해당 분야도 함께 발전을 하게 되었는데
만약 이 과정이 완벽하게 된다면
사용자가 물어보는 질의의 내용이
어떤 DBMS 내부에 존재하는 데이터로 답변할 수 있는 내용이라면
사람이 직접 SQL을 짜지 않아도
자연어 모델을 통해서 처리하도록 자동화가 가능하다
하지만 안타깝게도
현재까지는 그 정도로는 정확도를 끌어올리기가 어려운 상태이다
아무튼 우리 데이터베이스 수업에서 알려주신
가장 간단한 nl2query 방법론은
vectorDB + few-shot + prompting llm
의 조합으로 수행하는 것이다
크게 각 과정에 대해서 살펴보고
그 다음 코드를 보면서 구체적으로 짚어보려한다
1. DB의 table이나 column과 같은 schema정보
vectorDB에 embedding값 넣기
2. few-shot list를 embedding해서
vectorDB에 값 넣기
3. 사용자 질의가 들어오면 질의 embedding해서
vectorDB에 검색 -> 유사한 table, column 5개 추출
&
유사하다고 판단되는 예제인 few-shot sample을
3개 추출
4. 3번의 결과와 llm prompt를 사용하여 SQL 예측 유도
5. 예측된 SQL을 실제 DB에 돌려서 결과값 확인하기
이제 코드를 살펴보며 좀 더 구체적으로 들어가보자
참고로 본 게시글의 코드는
nl2query 과제 실습용으로
수업에서 제공해준 코드이다
1. 우선 SQL을 만들 때는 llm을 사용한다
llm에 few-shot과 prompting 학습 기법을 넣어서
최대한 SQL을 잘 작성하도록 만든다는 것인데
사실상 가장 쉬우면서도 가장 간단한데
노력 대비 성능이 생각보다는 괜찮긴하다
복잡한 자연어처리나 llm구조를 이해하지않고도
자연어처리 task를 어느 정도까지는 수행할 수 있기에
산업계에서는 많이 사용되는 듯 하지만
개인적으로는 정말 빠른 기능 구현이 목적이거나
성능이 크게 중요하지 않을 때만
사용해야하는 방법이라고는 생각한다
(하지만 정말 쉬운만큼 한계도 굉장히 많은 방법)
하지만 본 과제는 실습이기때문에
그냥 간단하게 체험하는 느낌에서 이렇게 한 듯 하다
우리 실습에서는 gpt-4o mini를 llm model로 사용하였다
2. 실제 DBMS의 schema 구조를 정형화 된 text로 만든뒤
vectorDB에 embedding 한 값을 넣는다
이는 이후에 자연어 질의가 들어오면
질의를 embedding하여 vectorDB 내부에서 검색해서
유사한 table과 column을 5개까지 뽑은 뒤
이걸 나중에 schema representation 단계에서 활용한다
우리는 vectorDB로는 ChromaDB를
embedding model로는 openAI의 embedding model을 사용하였다
vectorDB에 table + column 정보 가져와서 넣는 코드는
아래와 같다
import json
import chromadb
from chromadb.utils import embedding_functions

# Load schema information file
with open("superhero.json", "r", encoding="utf-8") as f:
    schema_data = json.load(f)

# Prepare documents and metadata
documents = [] # list of contents that will be transformed into embedding vectors ("{column} + {description}")
metadatas = [] # list of metadata that will not be transformed into embedding vectors, but still linked with the embedding vectors
ids = [] # (id for each data stored in vectordb should be in "text" format for current version of ChromaDB)

for table in schema_data:
    table_name = table["table"]
    for col in table["column"]:
        col_name = col["column_name"]
        description = col.get("description", "").lstrip("#").strip()
        document = f"column_name: {col_name}\n{description}"
        # e.g., "column_name: colour The colour column in the superhero table represents the color of the superhero's skin/eye/hair/etc."

        documents.append(document)
        metadatas.append({
            "table": table_name,
            "column": col_name
        })
        ids.append(f"col-{table_name}-{col_name}")

# ChromaDB setup
client = chromadb.PersistentClient(path="./vectordb/")

# Use OpenAI embedding model for embedding vector transformation.
openai_ef = embedding_functions.OpenAIEmbeddingFunction(
    api_key=OPENAI_API_KEY,
    model_name="text-embedding-3-small"
)

# Create collection
collection = client.get_or_create_collection("column_description", embedding_function=openai_ef)

# Save the data in collection
collection.add(
    documents=documents,
    metadatas=metadatas,
    ids=ids
)

print("Column descriptions saved to ChromaDB!")
3. few-shot sample들을 똑같이 vectorDB에 넣어주자
나중에 prompt에 few-shot 예제들을 넣어줄 때
사용자 질의와 유사한 few-shot sample들만 넣어주기 위함이다
코드는 아래와 같다
# Json file storing few-shot exmamples
jsonl_file = "fewshot.jsonl"

# Open Json file -> Pandas DataFrame
records = []
with open(jsonl_file, 'r', encoding='utf-8') as f:
    for line in f:
        records.append(json.loads(line))

df = pd.DataFrame(records)

client = chromadb.PersistentClient(path="./vectordb/")

openai_ef = embedding_functions.OpenAIEmbeddingFunction(
    api_key=OPENAI_API_KEY,
    model_name="text-embedding-3-small"
)

collection = client.get_or_create_collection("fewshot", embedding_function=openai_ef)

documents = df["question"].tolist() #
metadatas = df[["evidence", "question", "SQL"]].to_dict(orient="records")
ids = ["few-shot-" + str(qid) for qid in df["question_id"]]

collection.add(
    documents=documents,
    metadatas=metadatas,
    ids=ids
)

print("All few-shot examples saved in ChromaDB!")
4. vectorDB 내부의 table+column 데이터를
자연어 질의가 들어오면 유사도를 계산해서
뽑은 부분의 코드는 아래와 같다
자연어 질의를 embedding 할 때도
vectorDB때와 동일한 embedding model을 사용해준다
def find_relevant_columns(query, top_k=5):
    client = chromadb.PersistentClient(path="./vectordb/")

    openai_ef = embedding_functions.OpenAIEmbeddingFunction(
        api_key=OPENAI_API_KEY,
        model_name="text-embedding-3-small" # use same embedding model with one that were used for storing data in vectorDB
    )

    collection = client.get_or_create_collection("column_description", embedding_function=openai_ef)

    # Similarity Search
    results = collection.query(
        query_texts=[query], # batch available
        n_results=top_k # retrieve top k relevant data
    )

    print(f"\n🔍 Top {top_k} columns relevant to:\n\"{query}\"\n")

    for doc, meta, score in zip(results['documents'][0], results['metadatas'][0], results['distances'][0]):
        print(f"# Table: {meta['table']}, Column: {meta['column']}")
        print(f"# Description: {doc.splitlines()[1]}")
        print(f"# Score: {score:.4f}\n")

    return results['metadatas'][0]  # 리스트 of {table, column}
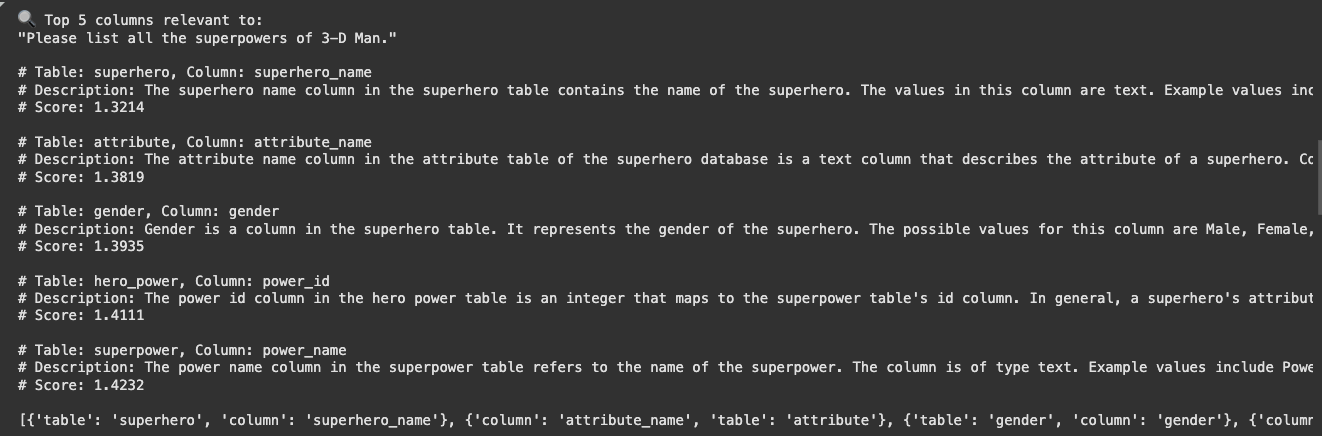
출력결과는 위와 같이 나온다
vectorDB는 score가 거리라서
점수가 낮을수록 유사한 것이다
5. 이제 schema representation 단계이다
DB의 schema를 llm이 알아듣기 좋게 텍스트 형식으로 만들어서
나중에 llm의 prompt에 넣어준다
코드는 아래와 같다
import json

def generate_filtered_schema(input_file, used_columns=None, include_descriptions=False):
    with open(input_file, "r", encoding="utf-8") as f:
        tables = json.load(f)

    output_lines = []

    if used_columns: # use schema selected from schema-linking
        used_set = set((item["table"], item["column"]) for item in used_columns)
    else:
        used_set = None  # use full schema instead of selected subset

    for table in tables:
        table_name = table["table"]

        if used_set:
            table_columns = [col for col in table["column"] if (table_name, col["column_name"]) in used_set]
            if not table_columns:
                continue
        else:
            table_columns = table["column"]

        output_lines.append(f"Table: {table_name}")

        for col in table_columns:
            col_name = col["column_name"]
            is_pk = col["PK"] == 1
            fk = col["FK"]
            desc = col.get("description", None)

            if is_pk:
                output_lines.append(f"- Column (PK): {col_name}")
            elif fk:
                output_lines.append(f"- Column (FK): {col_name}")
            else:
                output_lines.append(f"- Column: {col_name}")

            # include column descriptions in prompt?
            if include_descriptions:
                if desc:
                    cleaned = desc.strip().lstrip("#").strip()
                    output_lines.append(f"  - Description: {cleaned}")

        output_lines.append("")

    return "\n".join(output_lines)
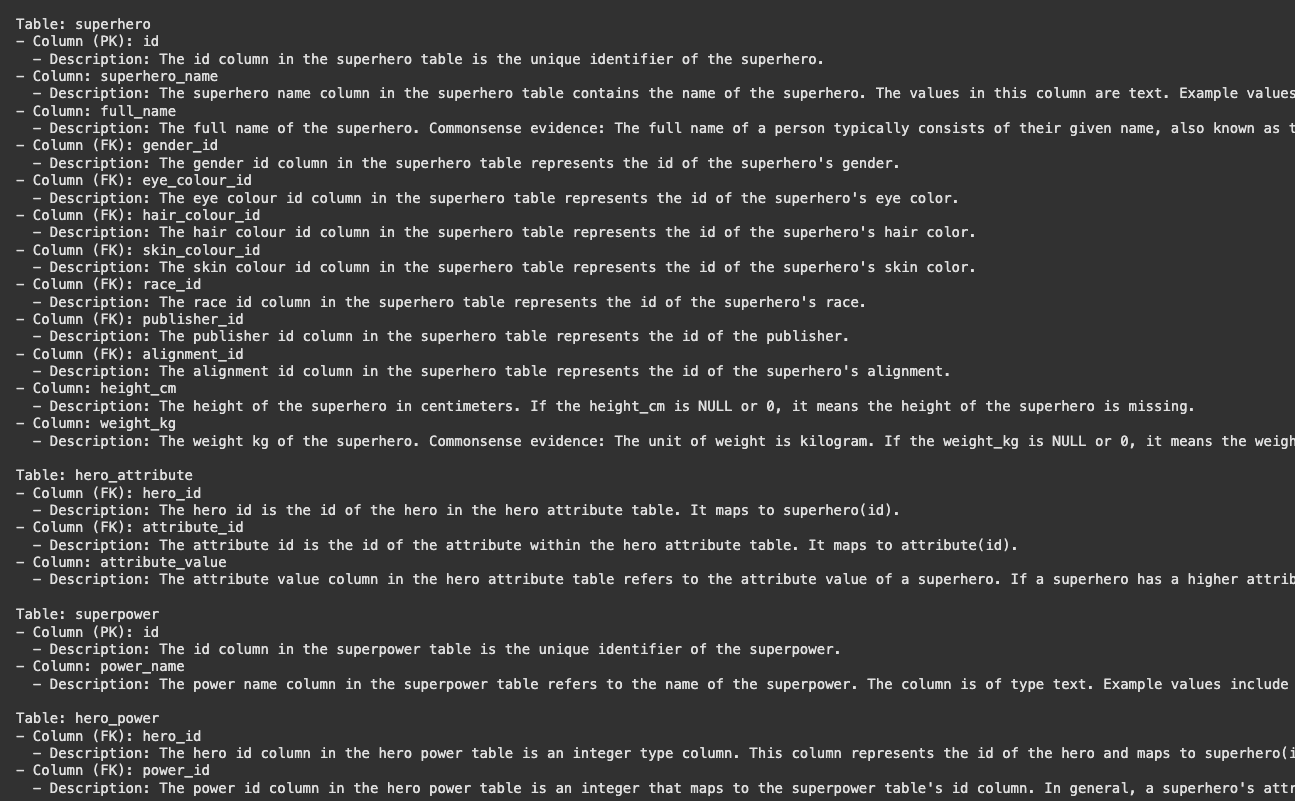
schema representation의 예시는 위와 같다
위와같이 table 이름과 각 column들의 이름과 설명,
그리고 pk, fk 여부가 적혀있다
6. 이제 또 prompt에 넣어줄 few-shot sample들을
vectorDB에서 검색해와야한다
few-shot sample은 3개만 넣어준다
코드는 아래와 같다
def get_relevant_fewshots(user_question, top_k=3):
    import chromadb
    from chromadb.utils import embedding_functions

    client = chromadb.PersistentClient(path="./vectordb/")
    openai_ef = embedding_functions.OpenAIEmbeddingFunction(
        api_key=OPENAI_API_KEY,
        model_name="text-embedding-3-small"
    )
    collection = client.get_or_create_collection("fewshot", embedding_function=openai_ef)

    results = collection.query(
        query_texts=[user_question],
        n_results=top_k
    )

    fewshot_blocks = []
    for idx, (doc, meta) in enumerate(zip(results["documents"][0], results["metadatas"][0]), 1):
        block = f"""### Example {idx}
            Question: {meta['question']}
            Evidence: {meta['evidence']}
            SQL:
            {meta['SQL']}"""
        fewshot_blocks.append(block)

    return "\n\n".join(fewshot_blocks)

fewshots_text = get_relevant_fewshots(user_question, top_k=3)
print(fewshots_text)
이제 본격적으로는 모든 준비가 끝났다
실제 DB와 연결한 후
BirdSQL에서의 정답 쿼리(Gold Query)와
gpt가 예측한 쿼리(predicted Query)를
실제 DB에 넣어서 답을 비교해보자
7. 간단한 실습이라 DB는 sqlite를 사용했다
import sqlite3

db_path = "superhero.sqlite"

def run_query(db_path, SQL):
  try:
      conn = sqlite3.connect(db_path)
      cursor = conn.cursor()

      cursor.execute(SQL)
      results = cursor.fetchall()

      # # PRINT RESULT (MIGHT BE REALLY LONG!)
      # print("Results:")
      # for row in results:
      #     print(row)

      return results
  except Exception as e:
      print("Error while executing query:", e)
      return None
  finally:
      conn.close()
그리고 정답 쿼리와 예측 쿼리에서 뱉은 답변을 비교하기위해
결과를 normalize하는 함수를 만들어줬다
def normalize_result(rows):
    # set comparison ignoring row/column order
    return set(tuple(row) for row in rows)
8. prompt는 이렇게 되어있었다
이게 대체로 많이 사용하는
few-shot prompting을 위한 prompt인 듯 했다
약간 정석같은?
prompt_template = """You are a data science expert.
Below, you are presented with a database schema and a question.
Your task is to read the schema, understand the question, and generate a valid SQLite query to answer the question.
Before generating the final SQL query think step by step on how to write the query.

Database Schema:
{DATABASE_SCHEMA}

Few-shot Examples:
{FEWSHOTS}

This schema offers an in-depth description of the database’s architecture, detailing tables, columns, primary keys, foreign keys, and any pertinent information regarding relationships or constraints. Special attention should be given to the examples listed beside each column, as they directly hint at which columns are relevant to our query.

Database admin instructions:
- Make sure you only output the information that is asked in the question. If the question asks for a specific column, make sure to only include that column in the SELECT clause, nothing more.
- Predicted query should return all of the information asked in the question without any missing or extra information.

Question:
{QUESTION}

Hint:
{HINT}

Please respond with a JSON object structured as follows:

{{
  "chain_of_thought_reasoning": "Your thought process on how you arrived at the final SQL query.",
  "SQL": "Your SQL query in a single string."
}}

Priority should be given to columns that have been explicitly matched with examples relevant to the question’s context.

Take a deep breath and think step by step to find the correct SQLite SQL query.
"""
9. 기존에 실습에서 제공해준 코드에서
BirdSQL의 Dev에서 sample code를 2개만 사용해서
정답 여부를 확인했었다
그래서 이를 바탕으로 일단
각 sample별 정답을 확인하는 코드를 작성해줬다
def generate_sql_using_llm(test_data_path):
  predicted_SQL_list = list()
  with open(test_data_path, "r", encoding="utf-8") as f:
      sample_data = json.load(f)

  for idx, sample in enumerate(sample_data):
    user_question = sample['question']
    knowledge_evidence = sample['evidence']
    gold_SQL = sample['SQL']

    relevant_columns = find_relevant_columns(user_question, top_k=5)
    fewshots_text = get_relevant_fewshots(user_question, top_k=3)

    prompt = prompt_template.format(
        DATABASE_SCHEMA=schema_info,
        QUESTION=user_question,
        HINT=knowledge_evidence,
        FEWSHOTS=fewshots_text,
    )

    response = llm.chat.completions.create(
            model='gpt-4o-mini',
            messages=[
                {"role": "user", "content": prompt},
            ],
            temperature=0
        )

    generated_text = response.choices[0].message.content
    generated_dict = json.loads(generated_text)
    predicted_SQL = generated_dict["SQL"]

    predicted_results = run_query(db_path, predicted_SQL)
    gold_results = run_query(db_path, gold_SQL)

    if predicted_results is not None and gold_results is not None:
      print(idx+1)
      print(f"user question :: {user_question}")
      if normalize_result(predicted_results) == normalize_result(gold_results):
          print("CORRECT !!")
          print(f"predicted SQL :: {predicted_SQL}")
          print(f"predicted answer :: {predicted_results}")
          print(f"expected answer :: {gold_results}")
          print()
      else:
          print("WRONG ... ")
          print(f"predicted SQL :: {predicted_SQL}")
          print(f"predicted answer :: {predicted_results}")
          print(f"expected answer :: {gold_results}")
          print()
이 부분은 내가 짜서 좀 안좋을 수 있는데
일단 실습코드인만큼 간단하게 결과만 보고싶어서
급하게 짰다
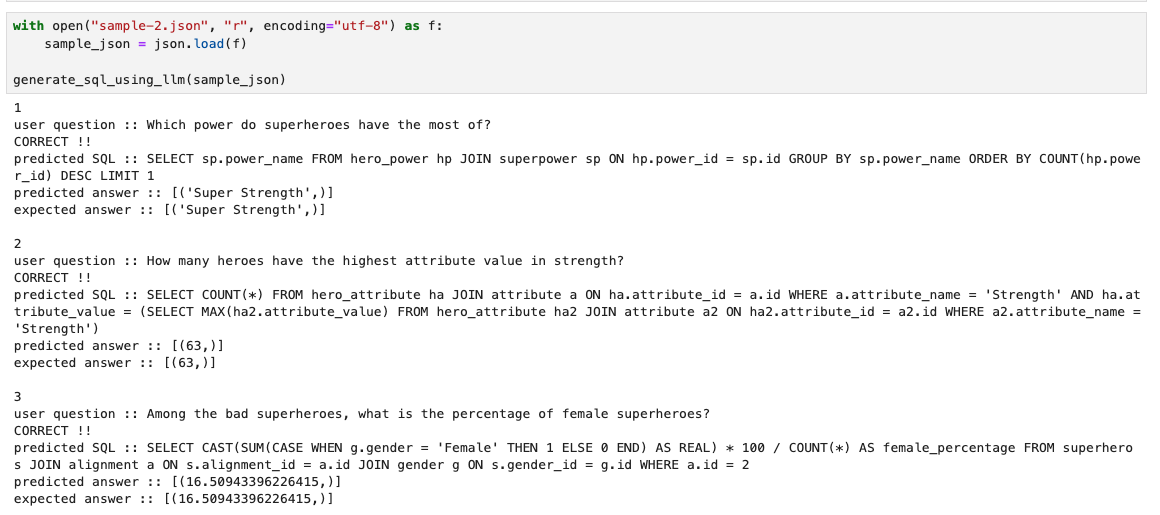
실습 예제로 주신 sample 2개에 대해서
해당 코드를 돌리면 아래와 같이 output이 나온다

2개의 예시에 대해서 다 정답을 맞춘 듯 하다
과제용 test dataset 추가
이제 과제를 내주시면서
해당 datase에 대해서도 테스트를 해보라고
sample query를 3개 정도 제공해주셨다
따라서 해당 sample dataset을
json으로 넣고 테스트를 진행해줬다
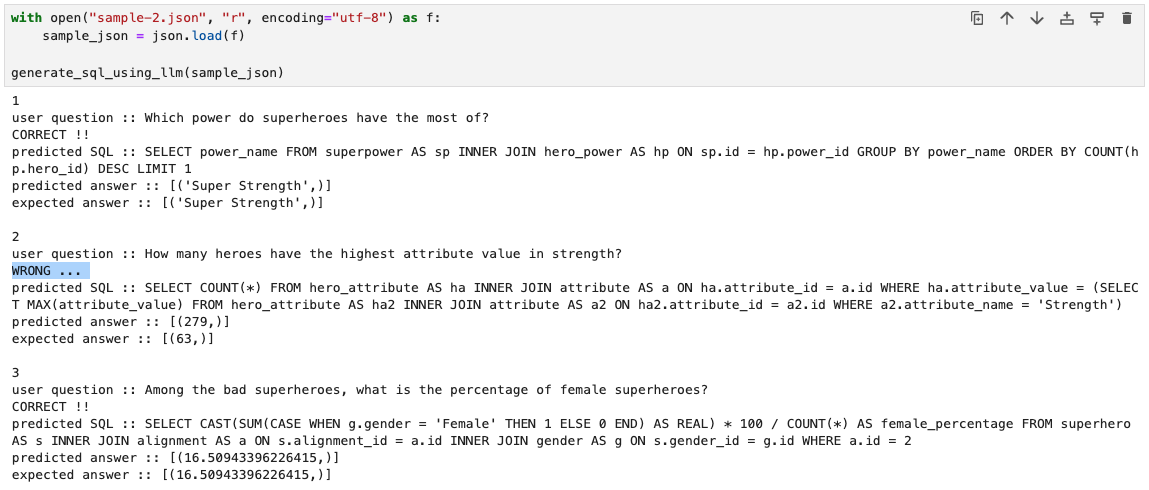
그런데 두 번째에서 틀린 것 발견..
(구글 코랩 불편해서 중간에 내 주피터로 잠깐 바꿈)
왜 틀렸는지를 한 번 살펴보자
질문이
strength에서 가장 높은 값을 가진 히어로는 몇 명이냐고 물어보고있다
attribute table에서 attribute_name이 strength인 것들 중에서
attribute_value가 max인 값을 subquery로 찾은 다음
다시 attribute table에서 해당 값과 strenght를 찾은 다음
hero_attribute와 Join해서 count를 세야한다
내 생각에는 predicted SQL에서
원래 쿼리에서 WHERE ha.attribute_value 이후에
and ha.attribute_name = 'Strenght' 조건이 있어야하는데
해당 부분이 빠진 것 같았다

chain of thought에서는 잘 말한 것 같은데
실제 쿼리에서는 왜 빠졌는지 모르겠다
어떻게하면 정답을 뱉게 할까?
이 부분을 해결하기 위해 우선 Prompt를 바꾸려고 해봤다
정말 특별한건 없고
prompt에 아래와 같이
attribute name으로 filter을 잘 걸라는
note를 추가해줬다

사실 저 문제만을 해결하게 하기 위해서라면
좀 더 구체적으로 attribute_name = 'Strength'를 반드시 명시하라거나하는
직접적인 지시를 해도 되지만
그럼 다른 쿼리에도 영향이 가고
general한 해결방법은 아니라고 생각했다
하지만 역시나 결과는 별 소득없이
똑같은 오답을 뱉어내고 끝났다
그래서 두번째로 생각한게
비슷한 few-shot 예제를 추가하는 것이었다
우선 few-shot이 prompt에 들어가게하려면
유사도 검색에서 뽑혀야하기때문에
우선은 정말 비슷한 쿼리로 few-shot 예제에 넣어줘봤다
{
  "question": "How many heroes have above-average Intelligence?",
  "evidence": ""evidence": "Intelligence is a value in the attribute table; hero_attribute links heroes to attribute values using attribute_id; Average Intelligence is computed from attribute_value where attribute_name = 'Intelligence'; Count heroes where their Intelligence is greater than this average;"",
  "sql": "SELECT COUNT(*)\nFROM hero_attribute ha\nJOIN attribute a ON ha.attribute_id = a.id\nWHERE a.attribute_name = 'Intelligence'\n  AND ha.attribute_value > (\n    SELECT AVG(ha2.attribute_value)\n    FROM hero_attribute ha2\n    JOIN attribute a2 ON ha2.attribute_id = a2.id\n    WHERE a2.attribute_name = 'Intelligence'\n  )"
}
위 예시를 few-shot sample로 넣어주고
vectorDB에 다시 넣어줬다
그러고 다시 해당 예제에 대해서
nl2query를 실행해줬더니

위와같이 이쁘게 내가 넣어준 fewshot sample이
1등으로 들어가고

정답을 맞춘 것을 확인할 수 있었다
다른 예제들에 대해서도
틀린 부분없이 맞추는 것을 확인할 수 있었다
test dataset 추가
여기까지가 과제에서 제공해준 그대로인데
아무래도 test dataset이 너무 작다는 생각이 들어서
BirdSQL에 들어가서 직접 dev dataset을 다운받았다
거기서 superhero DB에 관한 쿼리 내용만 뽑아서
다시 테스트를 해보았다
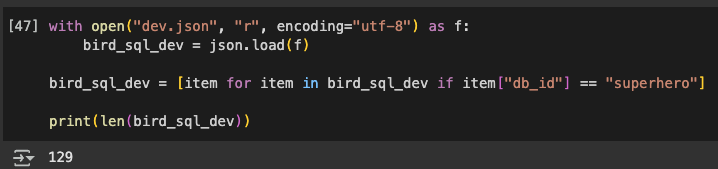
db_id가 superhero인 dev data는
총 129개가 나왔다
맘같아선 전부다 테스트해보고 싶었지만
수업에서 제공해준 API key를 사용하고 있었기 때문에
많이하면 민폐일까봐 우선 10개만 했다
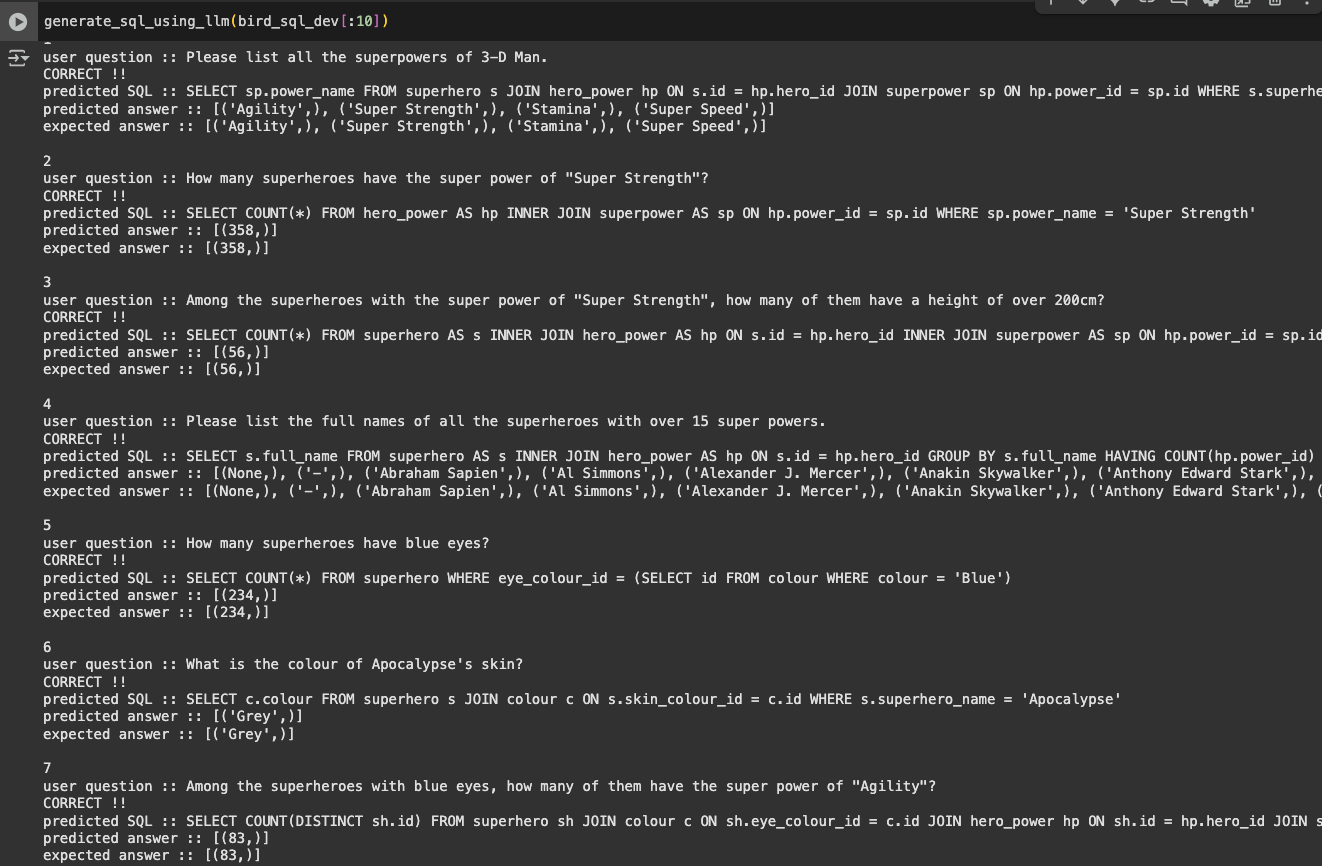
10개에 대해서 답변을 돌려본 결과이다
대부분 다 정답인 것을 확인할 수 있었다

마지막 친구에서 오답이 나왔다
여기서 왜 오답이 나왔는지를 좀 중점적으로 살펴보기로했다
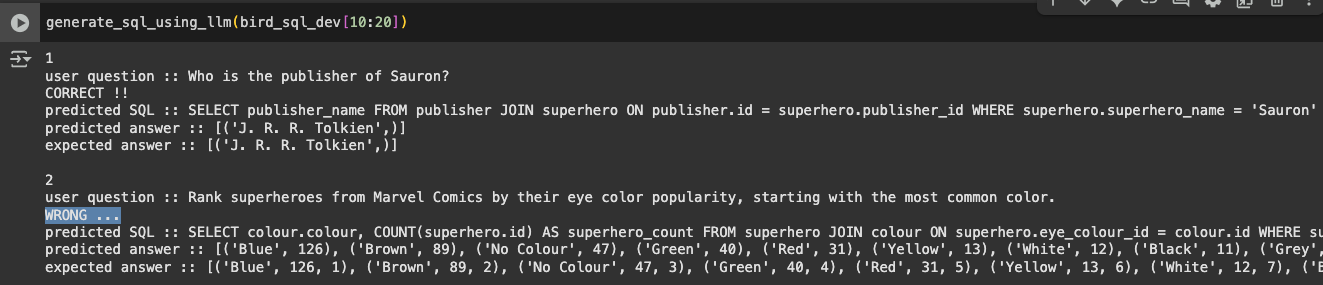
Q) Rank heroes published by Marvel Comics by their height in descending order.
저 질문에 대해서 expected answer과 predicted answer을 비교해보니
gpt가 만들어준 쿼리로 낸 답변에는
rank가 측정이 안되어있는 것을 확인할 수 있었다
하지만 질문에서 Rank라고 했으므로
기대 답변은 끝에 rank가 들어가길 바랬던 것이다
따라서 rank를 이해할 수 있도록
few-shot 혹은 prompt를 좀 보충해야겠다는 생각이 들었다
우선 다음 10개를 또 한 번 돌려보았다
(30개까지만 해 볼 예정이다..)
이번에도 2번 질문인 Rank 문제에서
똑같은 이유로 오답이 난 것을 확인할 수 있었다

또 마지막에서 틀린 문제가 발생했다
dumbest라서 가장 멍청한 사람 1명만 나와야하는데
predicted answer에서는 3명을 뽑아낸 듯 했다
최상급 표현에 대한 정의도 필요할 것 같았다
정말 마지막으로 딱 10개만 더 돌려보자
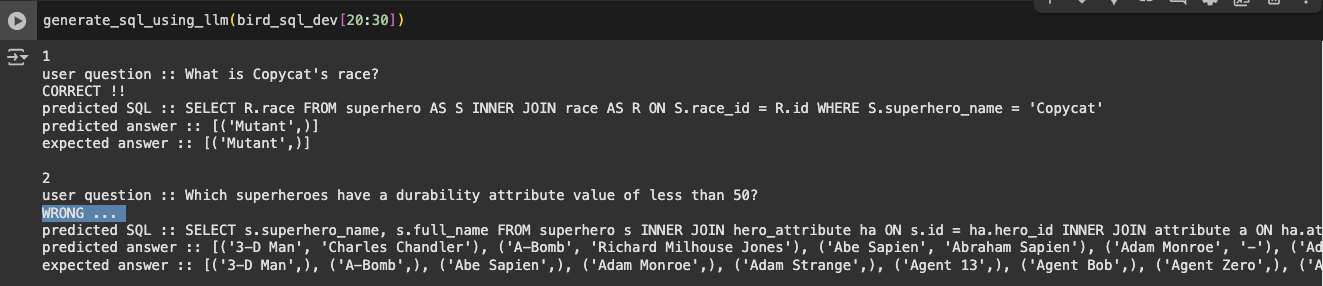
또 2번에서 틀린 문항이 발생했다
원인을 살펴보니 그냥 s.superhero_name만 뱉어내면 되는데
이유는 모르겠지만 s.full_name까지 다 뱉어낸 모양이다
이럴 때 가장 간단한 치트키(?)는
temperature를 낮추는걸로 알고있는데
이미 최저치로 낮춰져있는 상태긴했다
어떻게하면 정답을 뱉게 할까?
아무튼 위 오답 사례들을 바탕으로
prompt를 좀 고쳐서 어떻게 정답이 나오는지를
좀 확인해보려고한다..!
1. 우선 간단하게 Rank의 경우는
Rank라는 동사가 나오는 경우
순번도 같이 매겨주라는 예제를 보여주면 될 것 같다고 생각했다
일단 가장 단순하게 Note에
RANK() OVER (ORDER BY column DESC) can be used to assign a rank based on a column's value; Include the computed rank in SELECT;
해당 내용을 추가했는데 ..

고쳐지길 바랬던 질문들은 하나도 안고쳐지고
뭔 다른 멀쩡한 쿼리에 순위를 매기는 것을 확인할 수 있었다
그래서 'Rank'라는 말이 나오면
RANK OVER()를 쓰도록 prompt를 수정했다
If the natural language question includes the word “rank”, use the RANK() OVER (ORDER BY column DESC) SQL function to assign a rank based on a column’s value.
그랬더니...

틀렸던 문제에서 알음답게 정답을 뱉는 것을 볼 수 있다

두 번째로 틀렸던 문제에도
알음답게 rank가 매겨진다
2. 그다음은 최상급 혹은 최저급(?) 표현을
이해하도록 해보자
dumbest라고 질의가 들어왔는데 거기서 1명만 뽑지않고
리스트를 다 뽑아서 오답이 된 쿼리였다
- If the question contains a superlative expression (e.g., “most”, “least”, “highest”, “lowest”, etc.):
- LIMIT 1 at the end of the query
따라서 이런 note를 prompt에 추가해줬다

그랬더니 다행히도 instruction을 알아들어서
LIMIT 1로 제한하는 것은 확인할 수 있다
하지만 답이 또 틀린 이유는
superhero_name과 full_name 2개를 다 뱉어서인데
사실 이건..
뭐 틀렸다고 할 수 있나? 잘 모르겠다
질문에 full_name을 뱉지 말라는 말도 없었고
그렇다고 특정 뭐를 뱉으라는 말도 없었기때문에
내 기준 general한 관점에서는 크게 문제될게 없다고 판단했다
이런식으로 지금까지 틀린 문항들을 보면서
어떤 부분이 틀렸고 그래서 어떤식으로 고쳐야겠다고 생각해서
나름대로 고쳐봤지만
정말 이렇게 하는게 최선일까?
는 우리가 고민해봐야할 문제같다
왜냐하면 틀린 문제가 나올때마다
그렇게 무한히 그에 맞는 prompt를 넣어준다거나
fewshot example을 넣어주는건 한계가 있기 때문이다
결국은 general하게 성능이 좋아져야하는 것인데
이를 어떻게 해결할까는 사실
NLP 영역의 task이며
그쪽 분야로의 깊은 연구가 필요할 듯 하다
(DB쪽의 역할은 여기까지인듯하다 ㅎ,,)
아무튼 이번 게시글은 여기서 종료-!
'기술 > DB' 카테고리의 다른 글
| [neo4j] docker 환경에서 neo4j data dump 하기 + 새로운 neo4j에 dump 파일 풀기 (0) | 2025.04.03 |
|---|---|
| [Docker/mongoDB] docker compose로 mongoDB, mongo-express build하기 (Datagrip으로 MQL 실행) (0) | 2024.10.13 |
| [neo4j] 자체 개발 plugin implement하기(docker) (0) | 2024.07.31 |
| [리눅스/우분투] docker 설치 및 neo4j 이미지 다운 및 컨테이너 실행 (0) | 2024.07.30 |